09.10.2018
69

I'm doing a write up to hopefully help anyone wanting to do this project as I could not find much help for myself. I would rate this project about a 6 out of 10 for difficulty mainly because if you are not careful, there are some serious things that you could miss which I will point out. As for me, I have never been inside of the engine before so this was quite intimidating going into it but once started, if you have the right tools is pretty straight forward.
My installation was based on the instructions provided and several emails to Yoyodyne for clarification. I can't be 100% sure that everything I did was correct so please verify the steps for yourself as this is just a guide to give you an idea if you feel like it is something you would like to try yourself which you do at your own risk. Also read the service manual as a backup because they often specify specific ways to remove things.
If anyone spots any errors in my writeup, please let me know so I can correct them. Download free the game of life diversity activity for class. First we have the patient. My 2006 1000RR track bike looking at the clutch cover. If you are wondering why I have an engine mount bold missing, I had to remove my No cut frame slider. Before we start, I bought a brand new clutch pack with new springs to install and laid them out in stock order. There are two different friction plates (6,7) and two different steel plates (8,22). When put together in oem order, they will look like this: 6,22,7,8,7,8,7,8,7,8,7,8,7,8,6 and that is how they are in this picture.
You can see the first and last cluch plate (6) is thinner than the others (7). We will change the order when installing them per instructions from Yoyodynes Website.
Next, we add some engine oil to prelubricate all the parts. I just poured it over the stack and rotated the stack while tilting the pan to make sure everything gets covered. I didn't want to run them dry. Next we remove all the clutch cover bolts. You don't have to drain the oil as no oil will be lost when you take the cover off.
Yoyodyne slipper clutch on the way! If this is your first visit, be sure to check out the FAQ by clicking the link above. You may have to register before you can post: click the register link above to proceed.
Laporkan Penyalahgunaan Menurut saya pertanyaan ini melanggar Pedoman Komunitas Mengobrol atau gembar-gembor, konten untuk orang dewasa, spam, menghina anggota lainnya, Menurut saya pertanyaan ini melanggar Syarat Layanan Tindakan tidak baik terhadap anak di bawah umur,kekerasan atau ancaman, pelecahan atau pelanggaran privasi, pemalsuan identitas atau memberi represantasi yang salah, penipuan atau phishing, Rincian Tambahan Bila Anda yakin bahwa hak kekayaan intelektual Anda telah dilanggar dan ingin mengajukan komplain, silakan lihatkami. Download anime hatsune miku sub indo 3gp new downloads google. Laporkan Penyalahgunaan Menurut saya, jawaban ini melanggar Pedoman Komunitas Mengobrol atau gembar-gembor, konten untuk orang dewasa, spam, menghina anggota lainnya, Menurut saya, jawaban ini melanggar Ketentuan Layanan Tindakan tidak baik terhadap anak di bawah umur,kekerasan atau ancaman, pelecahan atau pelanggaran privasi, pemalsuan identitas atau memberi represantasi yang salah, penipuan atau phishing, Rincian Tambahan Bila Anda yakin bahwa hak kekayaan intelektual Anda telah dilanggar dan ingin mengajukan komplain, silakan lihatkami. Seperti, 'Black Rock Shooter' yg diadaptasi dari lagu berjudul sama OVA >> Series >> Dan yg paling baru, 'Kagerou Days' akan dibuat versi animenya Err, 'Kagerou Days' disini bukan judul lagunya [meski emang ada lagu berjudul sama], untuk lebih lanjutnya baca postingan ini aja deh >> http://id.answers.yahoo.com/question/index?qid=0307AATGsu7.
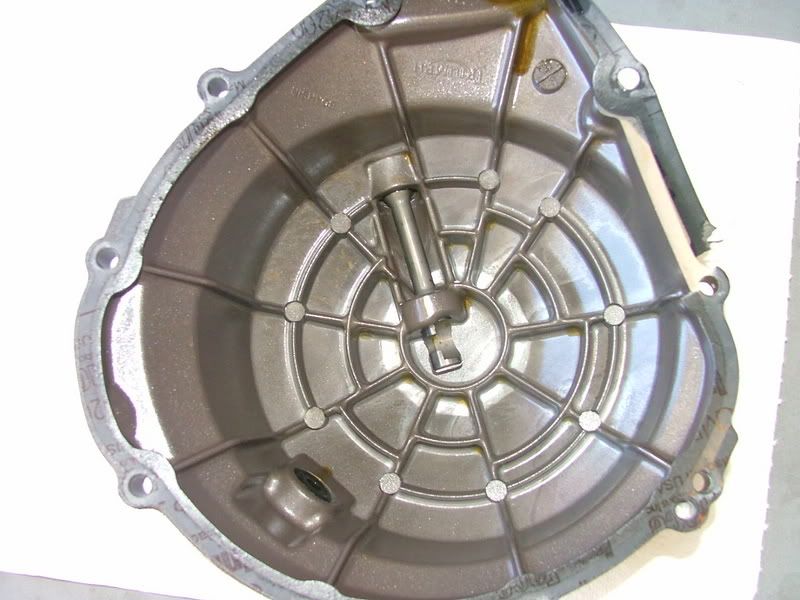
Use a large flathead screwdriver to pry the cover off. There are tabs on the cover you can use to pry. When you take off the cover (or before) unplug the wire at the red connector This is your first Gotcha if you are not careful. The thrust washer on mine was stuck to the inside of the cover as you can see if you look closely at the previous picture of the cover being removed.
In the next picture I slide it over so you can see where it is. If you don't notice it, it could fall off and you might miss putting it back. I forgot to take pictures here but if you look up one picture, I remove the five bolts and springs and remove the pressure plate. One the pressure plate is removed, you can use two small flat head screw drivers and start removing the clutch plates and metal plates.
Keep them in order because if they are in good shape you may want to keep them. Here is the next Gotcha! When you get to the last clutch plate, the Judder springs are inside of this plate. Note the order they are installed. The flat one is inside and the sloped one is after with the slope facing in toward the bike.
Remove the Judder springs and place them inside your first new clutch disk that we kept in OEM order and in the correct order you removed them. Next remove the cap in the very center that is on the end of the rod the disengages the clutch and put it in a safe place. You are now looking at the large nut you will need to remove.
Notice it is locked in place with a recess. I used a very small flatblade to lift this out as much as possible. I used a clutch holder and an impact wrench to remove the nut which made this very easy. If you don't have these two tools, I can't offer you much help here with alternate ways to remove this nut but I hear it is a pain.
When you remove the nut, there are two flat washers behind it. Remove them also and keep in order.
The middle one has a clearly marked outside. The user manual says to discrard the nut and replace with a new one. In my research I had read that it is often reused so use your best judgement here. This next step is the potential for a huge mistake.
When you remove the OEM clutch drum, the flatwasher will most likely be stuck to the rear of it as you can see in the next picture. As you are going to install the slipper in place of this drum, you could miss putting this washer back in if you didn't notice it. This is what you are looking at now with everything out of the way. My stock clutch was still in good shape so I zip tied it all together in order to keep. This is the new stuff that is going back in now.
I'm doing a write up to hopefully help anyone wanting to do this project as I could not find much help for myself. I would rate this project about a 6 out of 10 for difficulty mainly because if you are not careful, there are some serious things that you could miss which I will point out. As for me, I have never been inside of the engine before so this was quite intimidating going into it but once started, if you have the right tools is pretty straight forward.
My installation was based on the instructions provided and several emails to Yoyodyne for clarification. I can't be 100% sure that everything I did was correct so please verify the steps for yourself as this is just a guide to give you an idea if you feel like it is something you would like to try yourself which you do at your own risk. Also read the service manual as a backup because they often specify specific ways to remove things.
If anyone spots any errors in my writeup, please let me know so I can correct them. Download free the game of life diversity activity for class. First we have the patient. My 2006 1000RR track bike looking at the clutch cover. If you are wondering why I have an engine mount bold missing, I had to remove my No cut frame slider. Before we start, I bought a brand new clutch pack with new springs to install and laid them out in stock order. There are two different friction plates (6,7) and two different steel plates (8,22). When put together in oem order, they will look like this: 6,22,7,8,7,8,7,8,7,8,7,8,7,8,6 and that is how they are in this picture.
You can see the first and last cluch plate (6) is thinner than the others (7). We will change the order when installing them per instructions from Yoyodynes Website.
Next, we add some engine oil to prelubricate all the parts. I just poured it over the stack and rotated the stack while tilting the pan to make sure everything gets covered. I didn't want to run them dry. Next we remove all the clutch cover bolts. You don't have to drain the oil as no oil will be lost when you take the cover off.
Yoyodyne slipper clutch on the way! If this is your first visit, be sure to check out the FAQ by clicking the link above. You may have to register before you can post: click the register link above to proceed.
Laporkan Penyalahgunaan Menurut saya pertanyaan ini melanggar Pedoman Komunitas Mengobrol atau gembar-gembor, konten untuk orang dewasa, spam, menghina anggota lainnya, Menurut saya pertanyaan ini melanggar Syarat Layanan Tindakan tidak baik terhadap anak di bawah umur,kekerasan atau ancaman, pelecahan atau pelanggaran privasi, pemalsuan identitas atau memberi represantasi yang salah, penipuan atau phishing, Rincian Tambahan Bila Anda yakin bahwa hak kekayaan intelektual Anda telah dilanggar dan ingin mengajukan komplain, silakan lihatkami. Download anime hatsune miku sub indo 3gp new downloads google. Laporkan Penyalahgunaan Menurut saya, jawaban ini melanggar Pedoman Komunitas Mengobrol atau gembar-gembor, konten untuk orang dewasa, spam, menghina anggota lainnya, Menurut saya, jawaban ini melanggar Ketentuan Layanan Tindakan tidak baik terhadap anak di bawah umur,kekerasan atau ancaman, pelecahan atau pelanggaran privasi, pemalsuan identitas atau memberi represantasi yang salah, penipuan atau phishing, Rincian Tambahan Bila Anda yakin bahwa hak kekayaan intelektual Anda telah dilanggar dan ingin mengajukan komplain, silakan lihatkami. Seperti, 'Black Rock Shooter' yg diadaptasi dari lagu berjudul sama OVA >> Series >> Dan yg paling baru, 'Kagerou Days' akan dibuat versi animenya Err, 'Kagerou Days' disini bukan judul lagunya [meski emang ada lagu berjudul sama], untuk lebih lanjutnya baca postingan ini aja deh >> http://id.answers.yahoo.com/question/index?qid=0307AATGsu7.
Use a large flathead screwdriver to pry the cover off. There are tabs on the cover you can use to pry. When you take off the cover (or before) unplug the wire at the red connector This is your first Gotcha if you are not careful. The thrust washer on mine was stuck to the inside of the cover as you can see if you look closely at the previous picture of the cover being removed.
In the next picture I slide it over so you can see where it is. If you don't notice it, it could fall off and you might miss putting it back. I forgot to take pictures here but if you look up one picture, I remove the five bolts and springs and remove the pressure plate. One the pressure plate is removed, you can use two small flat head screw drivers and start removing the clutch plates and metal plates.
Keep them in order because if they are in good shape you may want to keep them. Here is the next Gotcha! When you get to the last clutch plate, the Judder springs are inside of this plate. Note the order they are installed. The flat one is inside and the sloped one is after with the slope facing in toward the bike.
Remove the Judder springs and place them inside your first new clutch disk that we kept in OEM order and in the correct order you removed them. Next remove the cap in the very center that is on the end of the rod the disengages the clutch and put it in a safe place. You are now looking at the large nut you will need to remove.
Notice it is locked in place with a recess. I used a very small flatblade to lift this out as much as possible. I used a clutch holder and an impact wrench to remove the nut which made this very easy. If you don't have these two tools, I can't offer you much help here with alternate ways to remove this nut but I hear it is a pain.
When you remove the nut, there are two flat washers behind it. Remove them also and keep in order.
The middle one has a clearly marked outside. The user manual says to discrard the nut and replace with a new one. In my research I had read that it is often reused so use your best judgement here. This next step is the potential for a huge mistake.
When you remove the OEM clutch drum, the flatwasher will most likely be stuck to the rear of it as you can see in the next picture. As you are going to install the slipper in place of this drum, you could miss putting this washer back in if you didn't notice it. This is what you are looking at now with everything out of the way. My stock clutch was still in good shape so I zip tied it all together in order to keep. This is the new stuff that is going back in now.