12.12.2018
98
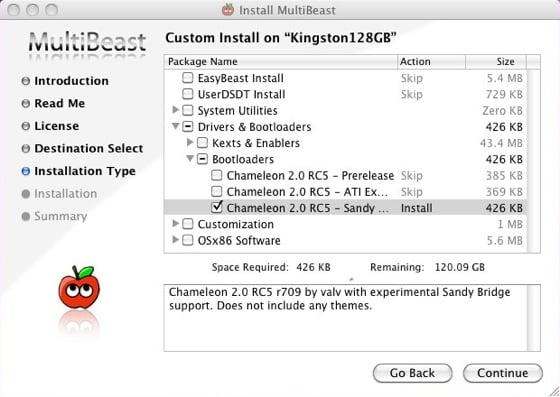

5.「MultiBeast - Snow Leopard 3.10.1」を再度実行 64-bit Apple Boot ScreenとSystem DefinitionsでiMac 12,2を選択(パーツ構成が近いため) 6.「MultiBeast.
Choose one of the following options directly following a fresh installation and update: EasyBeast is a DSDT-free solution for any Core/Core2/Core i system. It installs all of the essentials to allow your system to boot from the hard drive. Audio, Graphics and Network will have to be enabled separately. UserDSDT is a bare-minimum solution for those who have their own pre-edited DSDT. Place your DSDT.aml on the desktop before install. Audio, Graphics and Network will have to be enabled separately.
For full guide and method, check out For demonstration videos and updates, check out. If this utility has helped you, please consider a to support further MultiBeast development. Thanks in advance, and enjoy!
This boot loader looked pretty good and I’m hoping this will work with most of the 32 bit and 64 bit Intel processors, not sure for AMD. Required Products 1) 2) iBoot boot loader ( ) Download all three versions. Use the correct ATI or NVIDIA version depends on your physical display card. If nothing works then use ‘supported’ version. In this example I uses NVIDIA version. 3) or ISO file. ( if you have physical DVD, better make it ISO) 4) Make sure Virtualization Technology (VT) enabled on physical computer BIOS,.
As usual I’m showing this on my Intel Core2duo 2.66GHZ, 3GB, Windows 7 32 Bit computer. This boot loader works with Intel processors only, it may fail for AMD users.
Follow the steps to use iBoot loader on VirtualBox. 1) Create a new Virtual machine.
Other names, logos, and marks may be trademarks of their respective owners. The Vuze® name is a registered trademark of Azureus Software, Inc. Azureus Software, Inc., the developer and distributor of Vuze® is not responsible for 3rd party products, services, sites, etc. The Vuze logo, Vuze+™ name and logo, and frog logos are trademarks of Azureus Software, Inc., with registration applications pending in certain territories. Media player for torrent files.
Select Mac OS X Server as guest OS. 1.5GB RAM, 20 GB new hard disk (Attach it to SATA) VT, Nesting Pageing and PAE enabled. Remove EFI boot loader option under system. (To avoid booting from VirtualBox built in EFI loader) Allocate Video memory to maximum and select 3D acceleration under Display option. See Also 2) Mount appropriate iBoot boot loader ISO to CD Drive through Virtual Media manager. 3) Switch on Virtual machine.
You can see a screen as shown below, waiting for user input. Don’t press any keys. 4) Now unmount iBoot ISO and load Mac OS X ISO file. To do it, Right Click on CD icon on VirtualBox console and select More CD/DVD Images option as marked by arrows.
In Virtual media manager, browse for Snow leopard ISO file and press OK. When you see the same screen again, Press F5 to refresh CD ROM then ENTER Key. 5) I’m sure first installation screen will start normally.
6) When no disks listed for installation the go to utilities, disk utility and select virtual hard disk. Create a partition and give a name. Close the disk utility box once all done; newly created partition will be appeared for installation now. Select it and continue installation ( on same screen select customize and remove printer drivers and language option to save time and disk space) 7) Have you got “Install Failed” message at end of installation? Don’t bother. Just restart the virtual machine, that will also not work.
You have to do it from VB console (Machine-> ACPI Shutdown and power off) 8.) Make sure to load iBoot boot loader to CD ROM before it starts, if not “FATAL: No bootable medium found! System halted” error will appear. Mac OS X requires proper boot loader to boot from disk on non apple hardware. 9) On next screen, press Right Arrow Key, select Mac hard disk and ENTER. 10) There you go!