25.01.2019
27

Samsung Galaxy Tab GT-P1000 (Original Firmware) Official Flash File Download & See Instructions How to Flash Stock Rom in your Samsung Galaxy Tab GT-P1000. The latest Android L is now available for Galaxy Tab GT-P1000. The main thing is that it is not based on any ordinary custom ROM but its the famous Omni ROM. All thanks goes to hygo, the recognized member from xda who made all the efforts to develop this beautiful ROM. Bluetooth dongle for pc. After flashing this unofficial firmware you’ll not only experience the.
Samsung Galaxy Tab GT-P1000 (Original Firmware) Official Flash File Download & See Instructions How to Flash Stock Rom in your Samsung Galaxy Tab GT-P1000. How to Flash Samsung Galaxy Tab GT-P1000 Stock Rom Using Odin 1: Download and Install on your pc. In case you have previously installed the Samsung USB Drivers on your pc then Skip this task. 2: Download Stock Rom and extract it on your PC. After extracting you’ll be able to see these types of files: 3: Now Turn Off your Samsung Galaxy Tab GT-P1000.
4: Now, you need to boot into Download mode. To boot into Download Mode: Press and Hold Volume Down Key, Home Key and Power Key. At the point when Cellphone vibrates Leave the Power Key however Keep holding the Volume Down Key and Home key. You will boot into the Download Mode 5: In the Download mode you will have the capacity to see a Warning Yellow Triangle Sign. In this circumstance you need to press the Volume up key to proceed 6: on your PC an extract it. After extricating you will have the capacity to see the accompanying records: 7: Open Odin and connect your phone to the PC. 8: Once you have associated the Samsung to the PC, Odin will naturally perceive the gadget and show “Added” message at the bring down left board.
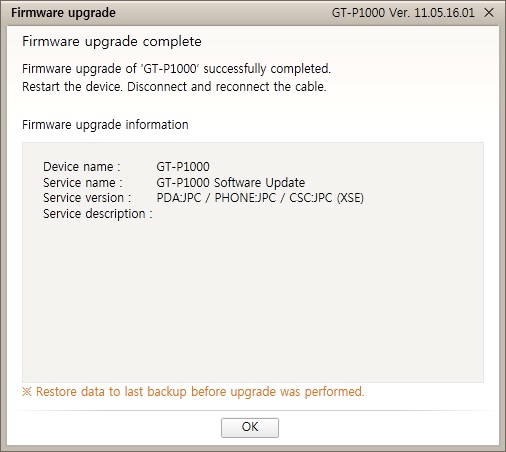
9: Once your Mobile identified by Odin, tap on the “PDA” catch and select the tar.md5 file that you have extricated in Step #2. 10:: Now, click on the “Start” button in Odin to begin the Flashing process. 11: Once you see, the Green Pass Message then evacuate the USB Cable from the Mobile Phone (During this procedure, your Phone will restart Automatically). 12: Your Samsung Device will now stuck at (boot circle). Now, You need to boot into Stock Recovery Mode, To Enable Stock Recovery mode: Press and Hold Volume UP key, Home Key, Power Key. When your device vibrates leave the power key yet keep holding the Volume UP key and Home key.
You will boot into the Recovery Mode. 13: In Recovery Mode, Wipe Data/factory reset. 14: After Cache Data is cleared, Press Restart Phone Now from the recovery menu.
15: Now, your Samsung Galaxy Tab GT-P1000 will restart with the Firmware you have downloaded.
Take a look at this complete video, then do it. I talk to you How to Samsung Galaxy Tab GT P1000 firmware flash with Odin.
Here is a step by step guide on how to flash Samsung Galaxy Tab GT P1000 ROM: Step 1. Download and install Samsung USB Driver on your computer or laptop. In case you have already installed the Samsung Driver on your PC then Skip this step.

Download Stock ROM compatible with your Samsung Tab GT P1000 device or if you have already downloaded the firmware file then ignore downloading it again, and extract it on your PC. Power Off your Samsung Tab GT P1000 phone.
Now, Boot into Download Mode: Press and Hold Volume Down Key + Home Key + Power Key. When device vibrates Leave the Power Key but Keep holding the Volume Down Key & Home key. Device will boot into the Download Mode. See a Warning Yellow Triangle Sign. In this situation you have to press the Volume-up key to confirm entering the download mode. Download and extract Odin on your PC. Now, Open Odin 3 tool and run it as administrator to start Odin.
And connect your device to the win PC. Once you have connected the Samsung Galaxy Tab GT P1000 to the PC, Odin will automatically recognize the phone and see 'Added' message at the lower left panel. Or connect your phone to the PC via USB cable. When your phone is connected, one of Odin ID:COM boxes will turn yellow and display the 'COM port' number.
Samsung Galaxy Tab GT-P1000 (Original Firmware) Official Flash File Download & See Instructions How to Flash Stock Rom in your Samsung Galaxy Tab GT-P1000. The latest Android L is now available for Galaxy Tab GT-P1000. The main thing is that it is not based on any ordinary custom ROM but its the famous Omni ROM. All thanks goes to hygo, the recognized member from xda who made all the efforts to develop this beautiful ROM. Bluetooth dongle for pc. After flashing this unofficial firmware you’ll not only experience the.
Samsung Galaxy Tab GT-P1000 (Original Firmware) Official Flash File Download & See Instructions How to Flash Stock Rom in your Samsung Galaxy Tab GT-P1000. How to Flash Samsung Galaxy Tab GT-P1000 Stock Rom Using Odin 1: Download and Install on your pc. In case you have previously installed the Samsung USB Drivers on your pc then Skip this task. 2: Download Stock Rom and extract it on your PC. After extracting you’ll be able to see these types of files: 3: Now Turn Off your Samsung Galaxy Tab GT-P1000.
4: Now, you need to boot into Download mode. To boot into Download Mode: Press and Hold Volume Down Key, Home Key and Power Key. At the point when Cellphone vibrates Leave the Power Key however Keep holding the Volume Down Key and Home key. You will boot into the Download Mode 5: In the Download mode you will have the capacity to see a Warning Yellow Triangle Sign. In this circumstance you need to press the Volume up key to proceed 6: on your PC an extract it. After extricating you will have the capacity to see the accompanying records: 7: Open Odin and connect your phone to the PC. 8: Once you have associated the Samsung to the PC, Odin will naturally perceive the gadget and show “Added” message at the bring down left board.
9: Once your Mobile identified by Odin, tap on the “PDA” catch and select the tar.md5 file that you have extricated in Step #2. 10:: Now, click on the “Start” button in Odin to begin the Flashing process. 11: Once you see, the Green Pass Message then evacuate the USB Cable from the Mobile Phone (During this procedure, your Phone will restart Automatically). 12: Your Samsung Device will now stuck at (boot circle). Now, You need to boot into Stock Recovery Mode, To Enable Stock Recovery mode: Press and Hold Volume UP key, Home Key, Power Key. When your device vibrates leave the power key yet keep holding the Volume UP key and Home key.
You will boot into the Recovery Mode. 13: In Recovery Mode, Wipe Data/factory reset. 14: After Cache Data is cleared, Press Restart Phone Now from the recovery menu.
15: Now, your Samsung Galaxy Tab GT-P1000 will restart with the Firmware you have downloaded.
Take a look at this complete video, then do it. I talk to you How to Samsung Galaxy Tab GT P1000 firmware flash with Odin.
Here is a step by step guide on how to flash Samsung Galaxy Tab GT P1000 ROM: Step 1. Download and install Samsung USB Driver on your computer or laptop. In case you have already installed the Samsung Driver on your PC then Skip this step.
Download Stock ROM compatible with your Samsung Tab GT P1000 device or if you have already downloaded the firmware file then ignore downloading it again, and extract it on your PC. Power Off your Samsung Tab GT P1000 phone.
Now, Boot into Download Mode: Press and Hold Volume Down Key + Home Key + Power Key. When device vibrates Leave the Power Key but Keep holding the Volume Down Key & Home key. Device will boot into the Download Mode. See a Warning Yellow Triangle Sign. In this situation you have to press the Volume-up key to confirm entering the download mode. Download and extract Odin on your PC. Now, Open Odin 3 tool and run it as administrator to start Odin.
And connect your device to the win PC. Once you have connected the Samsung Galaxy Tab GT P1000 to the PC, Odin will automatically recognize the phone and see 'Added' message at the lower left panel. Or connect your phone to the PC via USB cable. When your phone is connected, one of Odin ID:COM boxes will turn yellow and display the 'COM port' number.